Our friend Marcin @mailopl from Poland sent us this amazing tutorial and introduction to Phalcon. Check the first part here. Enjoy it!
Let’s create a blog from scratch
Introduction
We are going to walk through the process of creating a simple web application – blog.
Blog is often used as an introductory example, and there is a very good reason for that: it contains Create, Read, Update and Delete operations (CRUD for short), uses SQL database (NoSQL proponents move along please) as persistent storage - all of which are the basic building blocks of a web app.
In summary do not despair about yet another blog tutorial, it’s a great showcase for any framework, and since the concepts involved in a blog are so well known, it’s easy to follow. Step by step I will show you how:
- Download and install Phalcon and phalcon-developer-tools (command line interface - CLI)
- Configure www server (Apache)
- Create models containing business logic and validation routines
- Write controllers with basic authentication and authorization
- Implement views, where your HTML lives
- Use routing mechanisms for pretty URLs
Step 1 – Installing Phalcon
Writing any PHP application requires quite a lot software. Luckily it comes prepackaged for popular platforms LAMP (for Linux - Ubuntu), WAMP (for Windows), MAMP (for Mac OS X).
For this tutorial I will be using Apache2, MySQL 5.5 and PHP 5.4 on Windows 7. Granted you are running fairly recent version of PHP (>=5.3, any of the above mentioned provides one) you will be fine.
Once you download Phalcon, open php.ini in your favorite editor.
if you are using WAMP you will find it under C:\wamp\bin\apache\Apache2.X\bin\php.ini or for LAMP: /etc/php5/apache2/php.ini
Mac OS X users need to consult respective documentation.
In case of WAMP just add the following line: extension=php_phalcon.dll (when using LAMP - extension=php_phalcon.so ).
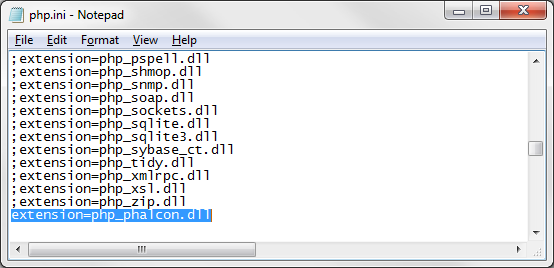
This will tell PHP to load Phalcon extension. Then copy php_phalcon.dll (or .so) from archive you downloaded to your PHP extensions dir (C:\wamp\bin\php\php5.3.X\ext in WAMP, /etc/php5/ext/ in LAMP).
Restart/reload the Apache and you are good to go.
Step 2 - Installing Phalcon developer tools
Installing developer tools requires slightly more effort.
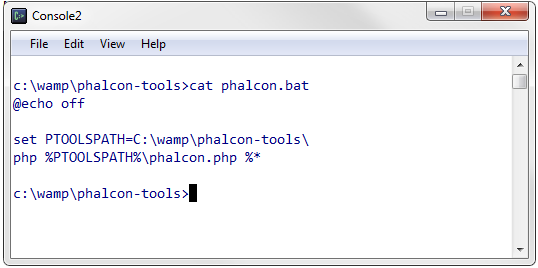
After downloading phalcon-developer-tools package (or git clone git://github.com/phalcon/phalcon-devtools.git ) you need to extract it to some convenient path, for example C:\wamp\phalcon-tools or ~/phalcon/tools on Linux.
On Windows you additionally need to add this path to and set PTOOLSPATH in c:\wamp\phalcon-tools\phalcon.bat file to c:\wamp\phalcon-tools\ On Linux you just need to run sh ~/phalcon/tools/phalcon.sh.
Remember to restart the console to reload the environment variables. Let’s try it out by listing available commands. Type phalcon commands:
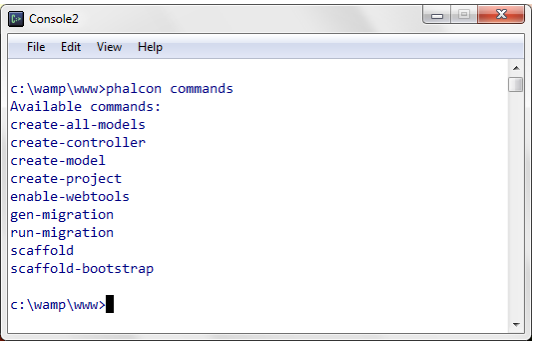
Everything works as expected.
Step 3 - Initial setup of our application
We’ve successfully set up the development environment. Now we proceed to create the skeleton of our application.
Navigate to the root of your WWW server (c:\wamp\www for WAMP package) and type following command:
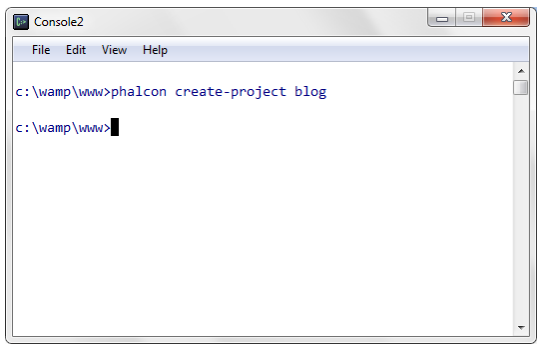
Phalcon creates following directories which I will explain below:
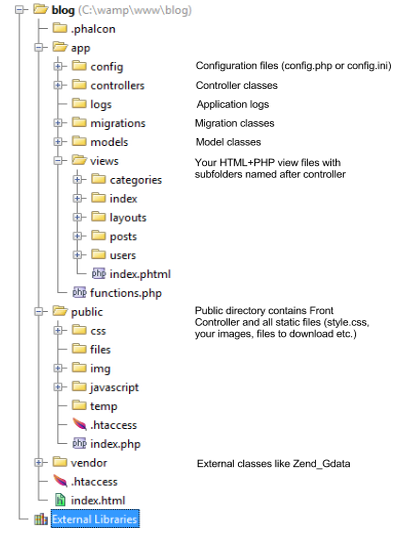
If you ever worked with MVC applications you should be familiar with this structure. We have here:
- an
appfolder, where our application is placed, public- where your static files will land, andvendorwhich is just a directory for external classes.
Step 4 - Configuring virtual hosts
This is an optional step which will allow you to use http://blog.net address instead of http://localhost/blog/ .
First we need to “trick” your operating system not to call Internet when you type in blog.net, but use locally running apache instead. We achieve that by editing C:\Windows\System32\drivers\etc\hosts (/etc/hosts for my Linux friends) and adding following line:
127.0.0.1 blog.net
Hosts file is the first file which gets checked during address resolution, i.e. it overrides the response that your DNS server would provide.
We also need to instruct Apache about incoming requests - up to this point Apache is completely oblivious to the fact that blog.net lives on your computer. Edit c:\wamp\bin\apache\Apache2.x\conf\httpd.conf (/etc/apache2/httpd.conf on Linux) and add following code:
<VirtualHost *:80>
     ServerName blog.net
     DocumentRoot "c:\wamp\www\blog"
     <Directory "c:/wamp/www/blog">
     </Directory>
</VirtualHost>
Restart Apache, and type in your browser http://blog.net

Step 5 - Initial configuration
There are a few things you need to configure at first:
- a database connection
- model, view, and controller directories
- base application URL (not needed if you use virtual hosts)
All configurations are stored in .php file /app/config/config.php (relative to root directory of our project).
<?php

    'database'    => [
        'adapter'  => 'Mysql',     // database adapter: Mysql, Postgresql, Sqlite
        'host'     => 'localhost', // your database host
        'username' => 'root',      // database username
        'password' => 'secret',    // and database password
        'dbname'   => 'blog',      // database name
    ],
    'application' => [
        'controllersDir' => '../app/controllers/', // controller classes folder
        'modelsDir'      => '../app/models/',      // model classes folder
        'viewsDir'       => '../app/views/',       // view files folder
        'baseUri'        => '/',                   // base application URL
    ]
];
Since you’ve used developer tools to generate project skeleton, there is no need to use custom directories: just copy and paste above definitions. we leave baseUri empty, because our application will run under blog.net and not blog.net/somepath. Only required change is the ‘database’ entry in Phalcon config, which should match you MySQL configuration.
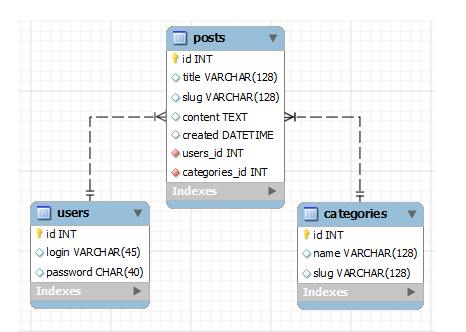
Step 6 - Database schema and configuration
For simplicity we’re going to create just three essential tables containing blog posts, users (in our case only one user – administrator) and post categories. Additionally we specify relationships between our entities as follows:
- User can have many Posts,
- (thus) Post belongs to one User
- and also to one Category
- (thus) Category can have multiple posts
Or if you prefer visual explanations, the same schema expressed as EER diagram:
create  table if not exists users (
        id int unsigned primary key not null auto_increment,
        login varchar(45) null,
        password char(40) null
);

create  table if not exists categories (
        id int unsigned primary key not null auto_increment,
        name varchar(128) null,
        slug varchar(128) null
);

create  table if not exists posts (
        id int unsigned primary key not null auto_increment,
        title varchar(128) null,
        slug varchar(128) null,
        content text null,
        created datetime null,
        users_id int unsigned not null,
        categories_id int unsigned not null,
        index fk_posts_users (users_id asc),
        index fk_posts_categories (categories_id asc),
        constraint fk_posts_users
         foreign key (users_id )
         references users (id )
         on delete no action
         on update no action,
        constraint fk_posts_categories
         foreign key (categories_id)
         references categories (id)
         on delete no action
         on update no action
);

--create admin account (login:admin, password:admin)

insert into users (login, password)
values('admin', 'd033e22ae348aeb5660fc2140aec35850c4da997');
I assume you are familiar with MySQL command line interface, PHPMyAdmin or HeidiSQL, so I leave out the details how to create a database. Do it with your favorite tool (but remember that it has to match Phalcon’s configuration) and execute the above code against MySQL database you created.
Step 7 - Models and validation
Few facts for beginners - in Phalcon:
- Model is just usual PHP class extending
Phalcon\Mvc\Model - Model name may be plural, if you use plural database table name
- Model is the place, where you usually store validation rules
- if you want to have model User and database table users you need to use getSource method.
We will now use phalcon developer tools to take advantage of the database schema and let our tools generate the code for us.
Using command line, navigate to your project’s directory and execute following command:
phalcon all-models --relations
This command will read database tables and create matching models. For example for table posts it will create Posts model. If you worked with MVC frameworks before, this convention (or minor variation thereof) should be familiar to you.
Additionally, if you specify --relations option, like I did below, Phalcon will generate all of the model relations based on foreign keys.
Let’s check out sample generated class Users for table users:
class Users extends Phalcon\Mvc\Model
{
    public function initialize()
    {
         $this->hasMany("id", "Posts", "user_id");
    }
    //...
}
We see here that it extends Phalcon\Mvc\Model class, like all database models should. In the initialize method Phalcon has automatically generated hasMany relation.
Mind the arguments provided: first is the primary key of User, second is the entity of the relationship (by convention written in plural form, because target model is Posts), last argument is the foreign key in the relationship.
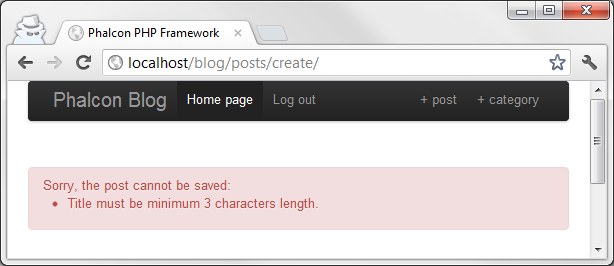
Second most important thing (one could argue that they are the most important) in models are validation rules. They ensure that no invalid records will be stored in the database. For example we often want to make sure that addresses that users enter are valid email addresses.
Let me show an example of the Users class validation:
use Phalcon\Mvc\Model\Validator\Email,
    Phalcon\Mvc\Model\Validator\Uniqueness;

class Users extends Phalcon\Mvc\Model
{
    public function validation()
    {
        $this->validate(
            new Email(
                [
                    "field"   => "login",
                    "message" => "The email is not valid"
                ]
            )
        );

        $this->validate(
            new Uniqueness(
                [
                    "field"   => "login",
                    "message" => "The login must be unique"
                ]
            )
        );

        return $this->validationHasFailed() != true;
    }

    //...
}
In the code above, we test if login field validates against the rule Email, additionally we ensure that login is unique. Take note of the return statement. Return statement checks if validation has returned any validation messages.
Except for Email and Uniqueness validation rules, Phalcon provides:
ExclusionIn(checks if value is not included in the given array)InclusionIn(checks if value is included in the given array)Numericality(checks if value is numerical)Regex(checks value against regular expression)StringLength(checks the minimum or maximum length of a string)
Since Phalcon automatically generated database relations, and we added some essential validation, we can create the mysterious mystery thing called scaffolding.
Step 8 - Scaffolding
Scaffolding is a temporary structure used to support people and material in the construction or repair of buildings and other large structures.”
When developing web applications, it usually means that scaffolding is a temporary View and Controller in our MVC pattern.
If you want, you can use scaffolding based on Twitter Bootstrap library. Even though scaffolding is a temporary solution it doesn’t mean it can’t look nice!
Keep in mind that when using scaffolding with bootstrap option, Phalcon will only generate HTML tags with appropriate HTML classes – it is up to you you need to include Twitter Bootstrap library on your own, so navigate to your project root and edit the file app\views\index.html by adding the line in section:
<link rel="stylesheet"
      type="text/css"
      href="//netdna.bootstrapcdn.com/twitter-bootstrap/2.2.1/css/bootstrap-combined.min.css"/>
We make use here of https://www.bootstrapcdn.com/ which is a great and straightforward way to simply get Twitter bootstrap files.
That’s actually all we need to use twitter bootstrap. Additionally you could include bootstrap javascript file, to enjoy additional benefits (modals, tooltips and many more!):
<script src="https://netdna.bootstrapcdn.com/twitter-bootstrap/2.2.1/js/bootstrap.min.js"></script>
Alternatively, if you don’t want to use third party CDN you can use above files provided by Phalcon and copied to appropriate directories. You need to adjust the paths in link and script tags accordingly.
Ok, that’s it for twitter bootstrap talk. Let’s create Post model scaffolding by simply typing in Phalcon CLI:
phalcon scaffold categories
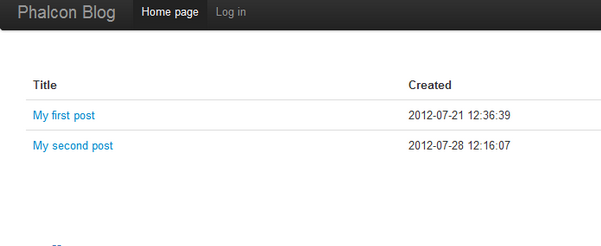
To check out how did that command work, simply open your browser and type: http://blog.net/posts and you should see the following result:
Step 9 - Controllers
Some facts for beginners - in Phalcon:
- controller is just an usual PHP class suffixed with a word “Controller”,
- action is just an usual PHP class method suffixed with a word “Action”
So you will want to be familiar with PHP5 OOP although you should be alright with knowing the basics.
Following code presents a very simple Controller skeleton and I’ll explain how view() and create() actions should look like, the rest of the code is available in the source.
class PostsController extends Phalcon\Mvc\Controller
{
        public function showAction($slug) {}
        public function indexAction() { }
        public function createAction() { }
        public function updateAction() { }
        public function deleteAction($slug) { }
}
The show() action Let’s start with simple view action which loads record from posts table and passes it to a view.
public function showAction($slug)
{
We can see here that despite of suffixing method name with Action, we pass method argument (action parameter) called slug.
Slug is just a field which contains unique version of the title field, without white spaces and tails, it helps with SEO, makes URL readable for human and it is widely used. When you request http://blog.net/posts/show/my-awesome-post slug will be my-awesome-post.
In the process of creating a post, slug is created basing on title field. At the moment Phalcon does not provide a class (method) for that, so I provided one in functions.php file.
So basically, you just remove unneeded characters from title (white spaces, trails) and insert it to a database in the form of a slug field.
Ok, let’s read that record from the database. When using a relational database (like MySQL), like we do in this tutorial, $slug variable will be escaped so we don’t have to deal with it.
$post = Posts::findFirst(
    [
        'slug = :slug:',
        'bind' => ['slug' => $slug]
    ]
);
Next, we need to check if post we wanted to retrieve, exists. If it doesn’t - false will be returned, and we should inform the user about that fact.
    if ($post === false) {
        $this->flash->error("Sorry, post not found.");
    }
And redirect him to an index page. We can do so by executing $this->dispatcher->forward() method which just changes the end flow of the application.
    $this->dispatcher->forward(
        [
            'controller' => 'posts',
            'action'     => 'index',
        ]
    );
In other case, we simply pass it to a view and the action ends.
$this->view->setVar('post', $post);
By default, show.phtml will be rendered (so it matches your method name). If you want to render a different view, you should use $this->view->pick(‘my-example-view') method. Let’s take care of creating a post.
The create() action
In order to create a Post, we need to login first which implies that we need to create a fast and simple authorization system. So before creating a blog post, we need to know if user X is authorized to create a blog post. We can do so, by creating loginAction() action in the UsersController.php:
public function loginAction()
{
    if ($this->request->isPost()) {
First, we need to ensure if login data was send via HTTP POST method.
    $user = Users::findFirst(
        [
            'login = :login: and password = :password:',
            'bind' => [
                'login'    => $this->request->getPost("login", "email"),
                'password' => sha1($this->request->getPost("password"))
            ]
        ]
    );
Now we are querying the database table users for certain row with matching login and password field. Additionally, we check if login field is in email format.
    if ($user === false) {
        $this->flash->error("Incorrect credentials");
        return $this->dispatcher->forward(
            [
                'controller' => 'index',
                'action'     => 'index',
            ]
        );
    }
If there’s no user – redirect and show the message.
    $this->session->set('auth', $user->id);
    $this->flash->success("You've been successfully logged in");

    return $this->dispatcher->forward(
        [
            'controller' => 'posts',
            'action'     => 'index',
        ]
    );
If everything is fine, set session variable, message and redirect. User is logged in now.
So if we want to check if the User has access to Post::createAction(), all we need to do is to check if matching session variable exists and contains expected value. (Keep in mind that this “authorization system” is very simple)
We do so, by typing:
public function beforeExecuteRoute($dispatcher)
{
    // actions which we want to keep from outside access
    $restricted = ['create', 'delete', 'edit', 'new'];

    // auth token
    $auth = $this->session->get('auth');

    // we check here if currently invoked action is restricted and if
    // the user is logged in
    if (in_array($dispatcher->getActionName(), $restricted) && !$auth) {
        $this->flash->error("You don't have access to this module");

        $dispatcher->forward(
            [
                'controller' => 'index',
                'action'     => 'index',
            ]
        );

        // Returning false means that execute the action must be aborted
        return false;
    }
}
Phalcon provides Access Control Lists component - Phalcon\ACL, which you’ll probably use when implementing more complex access rules.
Step 10 - Views
Phalcon does support templating systems like Mustache, Twig or the one provided by the framework called Volt, but you are free to use plain PHP, which we will just do. A typical view would incorporate usage of Phalcon\Tag component, convenient helper class that aids creation of forms, links and other html elements:
<!-- app/views/index.phtml -->
<?php use Phalcon\Tag as Tag; ?>

<ul class="pager">
    <li class="previous pull-left">
        <?= Tag::linkTo('posts/index', '← Go back ') ?>
    </li>
</ul>

<h1>
    <?= $post->title ?>
    <small>
        created <?= $post->created ?> by <?= $post->getUsers()->login ?>
    </small>
</h1>
Step 11 - Routing
We are almost done, we created models which represent our database tables, controllers - where the main logic is and views thanks to which we can present somehow the data. We can proceed to polish our application and implement fancy routing.
Routing allows us to use pretty URLs instead of the ugly ones.
Pretty URL is simply a URL in format like:
http://blog.net/posts or http://blog.net/posts/my-post.html
instead of:
http://blog.net/index.php?action=index&controller=posts or http://blog.net/index.php?action=view&controller=posts&slug=my-post .
There are tree steps necessary: one involves configuration of our web server and two other Phalcon.
In WAMP it’s easy: click on the WAMP icon tray -> Apache -> Apache modules -> rewrite_module.
On Ubuntu Linux just run sudo a2enmod rewrite && sudo /etc/init.d/apache2 restart.
Now we are good to go when it comes to writing rewrite rules. Phalcon doesn’t have a specified file for that matter, so let’s create one and tell Phalcon where to find it.

<?php

$router = new Phalcon\Mvc\Router();

$router->add(
    '/login',
    [
        'controller' => 'users',
        'action'     => 'login',
    ]
);

return $router;
Nice. Now all we’ve got to do is tell Phalcon where to find that route definition. Edit project_dir/public/index.php and add a new service:
<?php

$di->set(
    'router',
    function(){
        return include(__DIR__."/../app/config/routes.php");
    }
);
Your public/index.php file must look like this
That’s it, routing should now work as expected. You may now test these settings by entering http://blog.net/login/.
That was the last step in creating Phalcon web application, you may want to find out more and check out the docs or download them in PDF or check out recent changes on Phalcon blog.
Summary
I explained how to install Phalcon under Windows using WAMP or Ubuntu Linux and configure developer tools.
We went through the process of creating a simple blog application with twitter bootstrap, simple authorization and very simple ACL.
Chat - Q&A
Support
Social Media
Videos
<3 Phalcon Team